Why Use Playwright & Axe-Core for Accessibility Testing?
Accessibility testing with Playwright is like having a very meticulous, automated user. It opens the page in a real browser, clicks buttons, fills forms, opens menus… Basically, it goes through the site just like a person would. Why does this matter? Because a lot of accessibility issues only show up after you interact with the page.
For example, a hidden menu might trap keyboard users, or an error message might not be announced to a screen reader. Playwright makes sure these “hidden moments” are actually tested. This trait dramatically reduces test flakiness. Apart from that, automated accessibility testing with Playwright is valuable because it:
- Supports keyboard-only interaction.
- Tests how focus moves across the page and detects when it gets trapped.
- Offers multi-browser support: Chrome, Firefox, Safari/WebKit, etc.
- Uses the same languages your engineers work with (TypeScript, JavaScript, Python). So writing and maintaining tests fit naturally into development.
- Runs the scripts in your CI/CD pipeline, automatically checking accessibility before code even merges and allowing you to catch issues early.
In Playwright accessibility testing, Axe is like the expert that follows it around. It inspects the page at every step and points out problems like missing labels, poor color contrast, or elements that aren’t coded in a way that assistive technologies can read. It’s focused, practical, and tells developers exactly what needs fixing without overloading them with false alarms.
- It covers a large set of WCAG A and AA rules.
- It also explains the rules behind each issue and links them to WCAG criteria, helping you understand the reasoning behind the checks.
- Axe-core provides guidance on why each issue matters and how to fix it.
- It focuses on problems it’s confident in, minimizing false positives and reducing wasted time.
- Axe-core Playwright accessibility testing runs checks automatically and repeatedly, scanning pages whenever changes are made. Your teams can ensure fixes stay effective over time.
Playwright & Axe vs. Browser Extensions
A common question we hear is: “Why build a Playwright framework when I can just use a free extension like the Axe DevTools or WAVE Evaluation Tool?” It’s a fair point — extensions are simple and great for a quick, one-page check. However, for professional QA specialists, the difference is between checking a single frame and watching the whole movie.
While extensions are helpful for a “spot check,” they require a QA specialist to do the heavy lifting manually. Playwright & Axe-Core allows the team to simulate entire user journeys — like going from a landing page through to a complex checkout — and verify accessibility at every single state without lifting a finger. It transforms a manual, repetitive chore into a scalable, high-speed quality gate.
| Feature |
Browser Extensions (WAVE/Axe DevTools) |
Playwright & Axe-Core |
| Effort |
Manual. You must open every page and click “Scan” yourself. |
Automated. Scripts navigate through hundreds of pages/states automatically. |
| Dynamic Content |
Limited. You must manually trigger menus/pop-ups to scan them. |
Interaction-aware. It fills forms and interacts with the UI to find “hidden” errors. |
| CI/CD Integration |
Impossible. They require a human to be present. |
Native. Seamlessly fits into the build process for continuous monitoring. |
| Scalability |
Low. Checking a 50-page flow is a full-day task for a human. |
High. The same flow is checked in minutes across multiple browsers. |
Briefly, Playwright Axe accessibility testing is interaction-aware, browser-realistic, developer-friendly, and shift-left-ready. More importantly, it doesn’t oversell itself. Axe doesn’t even try to go into “people territory” with its checks. It leaves advanced scenarios and evaluations to engineers, knowing well that a person could deal with them far better. This respect for manual software testing is rare when it comes to automated tools.
And it’s a great reminder for your team to never disregard the value of human expertise.
How to Set Up Playwright Accessibility Testing with Axe Integration?
Getting started with accessibility testing using Playwright and Axe-core is straightforward. With that in place, installing the Playwright integration for Axe-core is just a single command:
npm install @axe-core/playwright
Once installed, you need to import the AxeBuilder class in your test file:
import { AxeBuilder } from '@axe-core/playwright';
This step is crucial. Without it, your test won’t know how to use Axe-core, and any reference to AxeBuilder will cause an error.
The AxeBuilder class is the core of Playwright accessibility testing. You can think of it as the engine that runs the accessibility analysis. Playwright itself is responsible for simulating a real user. But it doesn’t know how to check whether the page is accessible. That’s where AxeBuilder comes in. It connects your test to Axe-core and tells it exactly what to inspect.
How to Run Accessibility Testing with Playwright?
The simplest way to get started with your Playwright accessibility testing services is to create a basic page scan. It’ll open a web page, run an accessibility check, and report any violations. Setting up this test involves just a few steps.
The Basic Page Scan
First, you create a test file (for example, accessibility.test.js) and import the necessary tools:
import { test, expect } from '@playwright/test';
import { AxeBuilder } from '@axe-core/playwright';
Next, use the test function to start a new test case. It tells the tool that you wish to initiate a check.
test('should have no accessibility violations', async ({ page }) => {
  // Steps go here
});
Use the page object to navigate to the URL you want to scan. Don’t forget to add the await keyword so the test waits for the page to load.
await page.goto('https://website.com');
Inside the same test, you create an AxeBuilder object and give it the page object. This tells axe-core which browser tab to scan for accessibility issues. Then, you call the .analyze() method on that AxeBuilder. This actually runs the accessibility scan on the page you provided.
const results = await new AxeBuilder({ page }).analyze();
Use expect to check the scan results and assert that there are no accessibility violations. If any violations are found, the test will fail, alerting you to issues that need fixing.
expect(results.violations).toHaveLength(0);
In the context of Axe-core accessibility testing:
- results.violations is the list of accessibility issues that Axe-core found.
- .toHaveLength(0) checks that the list is empty (length 0).
- If the list is not empty, Playwright will mark the test as failed. This means there are accessibility problems that need fixing.
Alternatively, instead of failing the test, you can log the violations for review:
console.log(results.violations);
This will print all detected accessibility issues to the console, so you can see what needs attention without failing the test automatically.
In the end, a complete test will look like this:
import { test, expect } from '@playwright/test';
import AxeBuilder from '@axe-core/playwright';

test('should have no accessibility violations', async ({ page }) => {
  // Open the page you want to test
  await page.goto('https://example.com');

  // Run an accessibility scan on the page
  const results = await new AxeBuilder({ page }).analyze();

  // Check that there are no accessibility violations
  expect(results.violations).toHaveLength(0);
});
This basic page scan is a “Hello World” for Axe-core Playwright accessibility testing. Even a simple setup like this can automatically detect common issues, providing immediate, actionable feedback to improve your site’s accessibility.
Targeted Scans & Exclusions
Not every part of a page is always relevant for Playwright accessibility testing. Sometimes, you only want to check the areas of your website that you actually control, skipping third-party widgets, embedded ads, or external scripts that you can’t fix. This is where targeted scans and exclusions come in.
The @axe-core/playwright package provides .include() and .exclude() methods to refine your tests.
- .include() lets you specify exactly which elements or sections of the page should be scanned.
- .exclude() allows you to skip certain areas.
By using these methods, you can focus your accessibility checks on the parts of the page that matter most, avoid false positives, and reduce noise in your test results.
Here’s an example:
const results = await new AxeBuilder({ page })
  .include('#main-content')       // Only scan the main content area
  .exclude('.third-party-widget') // Skip a third-party widget
  .analyze();

expect(results.violations).toHaveLength(0);
In this snippet, the test focuses on the main content of the page while ignoring a widget you don’t control. The result is a cleaner, more actionable report with violations that you can actually fix.
How To Customize Axe-Core Accessibility Testing with Tags & Rules?
One of the strengths of Axe-core Playwright accessibility testing is that you can tailor your scans to match your project’s compliance requirements or focus on what matters most.
Axe-core lets you filter checks using tags, which correspond to common accessibility standards:
- wcag2a = basic accessibility requirements (level A).
- wcag2aa = more advanced requirements (level AA).
- best-practice = general recommendations beyond WCAG.
By specifying tags, you can focus the scan only on the rules relevant to your compliance goals, saving time and avoiding noise from checks that aren’t required for your project.
const results = await new AxeBuilder({ page })
  .withTags(['wcag2aa', 'best-practice'])
  .analyze();
Sometimes, tools may flag issues that are false positives or known limitations of your project. In these cases, Axe-core accessibility testing library lets you disable specific rule IDs to avoid irrelevant warnings.
const results = await new AxeBuilder({ page })
  .disableRules(['color-contrast', 'label'])
  .analyze();
Here, Axe-core will skip the color-contrast and label rules for this scan. This is useful when you know certain violations are acceptable or handled in another way.
Analyzing Results in Playwright\Axe Accessibility Testing
After running an accessibility scan with Axe-core, the next step is to understand and act on the results. Axe-core returns a JSON object containing detailed information about what it found:
- violations define accessibility issues that need fixing.
- passes mark checks that passed successfully.
- incomplete signifies checks that could not be fully evaluated.
const results = await new AxeBuilder({ page }).analyze();

// Inspect violations in the console
console.log(results.violations);
This simple logging step lets you see exactly which issues Axe-core detected.
Automated accessibility testing with Playwright includes a built-in HTML reporter. So you can attach your Axe results to it for a human-readable, visual report. This makes it easy for developers and QA teams to review accessibility issues.
test('should have no accessibility violations', async ({ page }, testInfo) => {
  await page.goto('https://example.com');
  const results = await new AxeBuilder({ page }).analyze();

  // Attach a JSON report to Playwright test report
  await testInfo.attach('accessibility-results', {
    body: JSON.stringify(results, null, 2),
    contentType: 'application/json',
  });
});
If you want even prettier HTML reports, you can use tools like Axe-html-reporter to generate fully formatted reports from the JSON data.
As well, you can attach the custom reporter to make the results look much better. See how we created custom reports for one of our projects.
Our detailed Page Issues Report displays all accessibility issues detected on a specific page during an automated accessibility scan. For each issue, it shows the violated rule, severity, a description, a link to official documentation, the exact affected HTML element, and clear fix recommendations. Page Issues Report helps developers and QA engineers quickly understand, locate, and fix accessibility problems.

Page Issues Report
The next one is our detailed Summary Report for all pages that provides an aggregated view of accessibility issues across the entire application. It shows the total number of violations and a per-page breakdown, allowing teams to quickly identify which pages have the highest concentration of accessibility problems. Instead of chasing tiny bugs one by one, the Summary Report allows you to see and fix the biggest problems first.
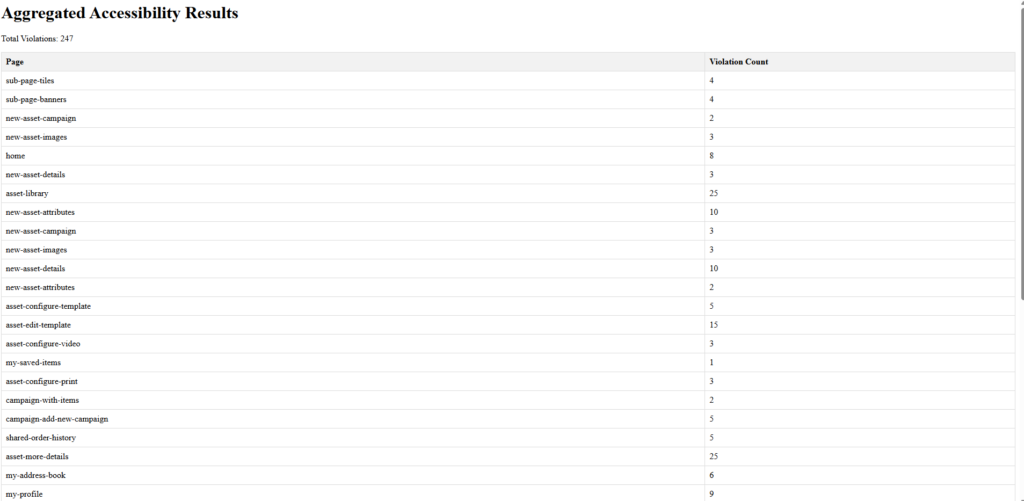
Summary Report
Best Practices for Playwright Accessibility Testing with Axe
Accessibility testing should always be strategic. So, whether you’re just starting out or initiating a WCAG accessibility audit for EAA compliance, your checks should have structure and depth. Here are a few tips from our QA services professionals.
Catch Major Issues Early
Not every commit needs a full accessibility audit. Use a simplified smoke test on every commit to quickly catch major issues. Then run WCAG scans during nightly builds or pre-release pipelines to ensure comprehensive coverage. This balances speed with thoroughness.
Manual checks also need to be applied carefully. You don’t want them to stall development. Learning how to do accessibility testing manually ensures targeted checks catch nuanced issues without slowing down your workflow.
Save Time & Reduce Repetition
You don’t have to repeat the same AxeBuilder configuration (tags, disabled rules, etc.) in every test file. Instead, create a custom fixture that sets up a pre-configured makeAxeBuilder. This keeps your tests concise and maintainable.
Here’s an example of extending the standard test object with a pre-configured AxeBuilder:
import { test as base } from '@playwright/test';
import AxeBuilder from '@axe-core/playwright';

// Extend the test object to include a pre-configured AxeBuilder
export const test = base.extend({
  makeAxeBuilder: async ({ page }, use) => {
    const axe = new AxeBuilder({ page }).withTags(['wcag2aa', 'best-practice']);
    await use(axe);
  },
});
Now, in your tests, you can simply do:
test('should have no accessibility violations', async ({ page, makeAxeBuilder }) => {
  await page.goto('https://example.com');
  const results = await makeAxeBuilder.analyze();
  expect(results.violations).toHaveLength(0);
});
This approach reduces repetition and ensures consistency across your test suite.
Prevent Regressions & Ensure Continuous Compliance
Playwright accessibility testing is most effective when it’s built into your development workflow. Integrate tests into your CI/CD pipeline so that:
- Every pull request automatically runs a smoke test, catching major issues before code is merged.
- Nightly or pre-release builds run the full WCAG scan, providing a comprehensive overview of the project’s accessibility health.
- Test failures are clearly reported in the CI dashboard, so developers immediately know which pages or components need attention.
This approach prevents regressions, ensures accessibility is considered continuously, and gives teams actionable feedback without slowing down development.
Focus on What Really Matters
Not all accessibility issues require the same level of action. A smart workflow prioritizes based on severity:
- Minor issues (like cosmetic ARIA improvements or low-impact contrast warnings): log them as warnings so developers are aware without blocking the build.
- Critical issues (like missing form labels, broken keyboard navigation, or inaccessible modals): fail the test/build, preventing deployment until the issue is resolved.
By differentiating severity, your team can focus on fixing the issues that actually block users while still tracking smaller improvements over time. This also makes the test suite practical and sustainable for long-term use.
Accessibility Testing with Playwright Isn’t Limitless
Finally, keep a pivotal point in mind. Automation isn’t almighty. Yes, Playwright and Axe will help you cover 30-50% of issues. But that means that there are 50-70% of defects that go unnoticed unless reviewed by a human specialist.
Playwright accessibility testing with Axe-core won’t tell you whether alt text is accurate or meaningful. It won’t spot logic errors in how a page behaves. It won’t fully understand the nuances of navigating a site using assistive technologies. Even AI, which keeps advancing, can’t replace human judgment and insight.
A professional’s experience and skills are the most valuable asset. Without it, any tool’s impact is only a drop in the ocean. Our QA company can be that asset for you:
- Fast, efficient, and consistent testing processes.
- Accessibility specialists ready to jump in immediately.
- Access to a full range of assistive technologies, devices, and testing infrastructure without the need for your own investment.
- Deep expertise in WCAG standards, ARIA, and practical workflows with real assistive technologies.
- Independent, unbiased evaluations that carry credibility with regulators and procurement teams.
- Clear, actionable guidance for developers and stakeholders to fix accessibility issues.
- Significant time savings for your internal teams, allowing them to focus on core product work.
- Flexible resources that scale across multiple products, pages, or platforms at once.
- Experience handling edge cases and complex interactions that internal teams may not encounter regularly.
- Insights and recommendations that support long-term improvements in accessibility practices.
All these resources will be especially valuable if you’re rushing to comply with EAA or build internal capabilities. Because accessibility testing that provides long-term benefits requires a lot of effort. And it’s better to do it right than endure the aftermath of subpar work. If you’re interested in knowing what full adherence to the new laws means, check out our guide on how to audit a website for accessibility. It’s a realistic breakdown of what accessibility takes.
To Sum Up
There are two key takeaways we’d like to leave you with. First, Axe-core Playwright accessibility testing is extremely helpful. It’s user-friendly and powerful in terms of features — overall, a superb option. Second, there’s only so much a tool can do. And until the AI uprising happens, a specialist’s skills are still superior. So, always supplement your automation efforts with expert-led accessibility reviews. Because it’s always the latter that makes all the difference.
We can help you make that difference.
Get a personalized accessibility testing strategy
Contact us